
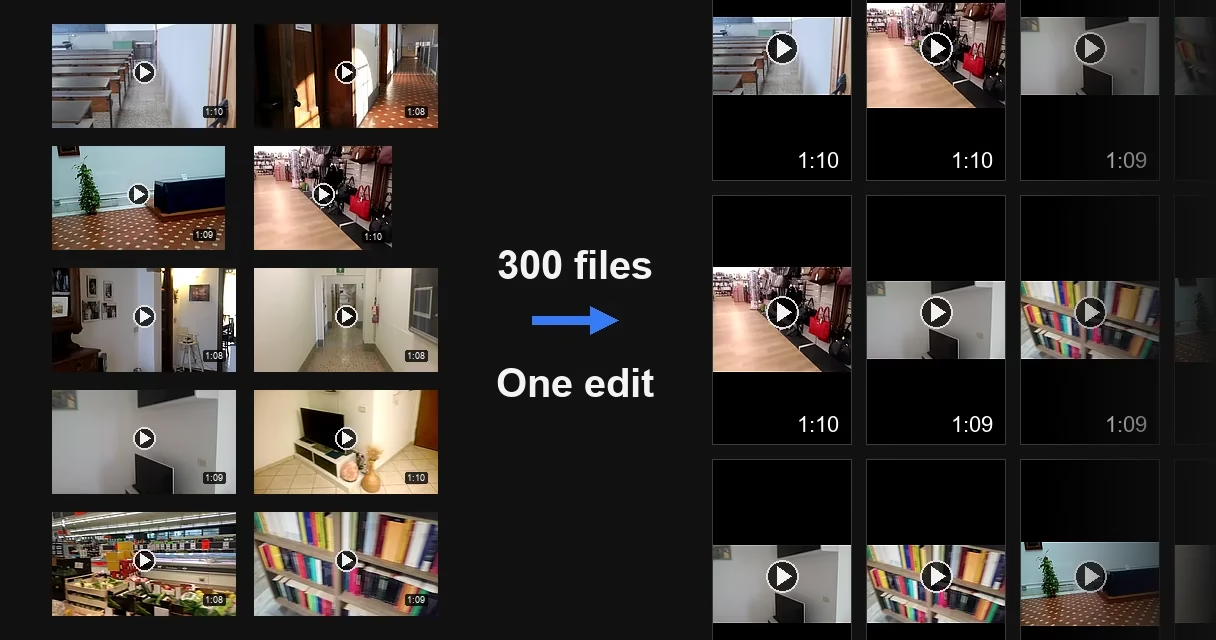
A folder holds three hundred videos. Each one needs the same edits: bring it to one size, remove the audio, crop the frame. That is batch video processing: you set things up once and process the whole folder. There are three ways to do it: your own command in a loop, a program with a job queue, and a program with bulk export. The first two apply one edit to the whole folder; the third makes different copies of every video. Ready-made commands for all three edits, and for conversion, compression and an intro, are in the section on the first approach.
After that come four cases where processing goes wrong without any warning. The same section has a command that checks the output. It prints a list of suspicious files, and those are the only ones you will need to open.
With the recommended recipe from the first section, processing took us about half as long as the recordings run. We processed ten videos of untouched camera footage: 11 minutes 56 seconds of recording, 1.1 gigabytes. According to their headers, each runs 69-77 seconds. Processing took 6 minutes 23 seconds, or 38 seconds per file. At 38 seconds per file, three hundred such videos will take about three hours. Measure the exact time on five of your own files. We did not measure videos of other lengths: according to the headers, all ten are about seventy seconds long.
The actual recording in these files is 26 seconds shorter than their headers say. One video has the wrong duration in its header; that case is covered below. Time depends on more than length. In another run of the same recipe, four videos from one device, with the same resolution and almost the same length, took from 53 to 149 seconds each. The computer was busy with other work during that run. The two videos with a rotation flag took the longest.
Who measured, and on what. We, the developers of Video Unique Booster, did the measurements: the main one on September 23, the other checks on September 26, 2026. The videos come from EVA-7K, an open research dataset 18. It is smartphone footage collected for research on verifying whether videos are authentic. We used only untouched videos, straight from the camera. Copies re-saved by editing software are kept separately in the dataset, and we left them alone. The computer: an Intel Core i5-12400F processor and 32 gigabytes of memory. FFmpeg: a build from July 21, 2024. On a different processor, the seconds will be different.
Something else matters more. We processed the same ten videos a second time with a short command that does not preserve the aspect ratio. It is usually the first command people write. Only two files out of ten came out vertical both in the file and on screen, and that was by accident. The tool flagged the other eight in a way that makes the player turn them back into horizontal videos. The work was wasted. There was not a single warning: all ten exit codes were zero.
Who needs this
It is for people whose files come in dozens and hundreds. For example, you may need to cut videos for different platforms or put an intro at the start of every video. Or you may need to bring mixed source files to one look, convert a folder to another format or compress it.
Here is how people describe it themselves. On a Russian-language Linux forum: “I have a collection of 1,023 video files. They are all in one folder,” and further on: “take a screenshot at the 7th second of every file” 4. On Habr, a Russian-language tech site: “We use it in our project to process more than one and a half thousand videos” 5. A person who runs a clothing brand makes videos for more than a hundred products every day 6.
We had this volume of work in our Instagram network of about 300 accounts, from March to August 2025. Each account published three Reels a day. Every post got its own unique copy of the video. On just the 217 accounts for which we still have an analytics snapshot, 6,690 Reels were published. We always processed these videos as a whole folder in one run, never one at a time.
It is not for people with two or three files: the setup pays off through the number of files that come after it.
Video Unique Booster for Windows: hundreds of unique copies in one goBy hand, you edit copy after copy. The program creates them in batches. Each copy gets its own image, sound, metadata and duration.
Video Unique Booster: video uniquification for WindowsYou add a video and set the setting ranges. The program creates hundreds of copies. Each has its own image, sound and duration.
Hundreds of unique copies from one original videoThe manual way runs into one problem. Each copy has to be edited separately. More copies take more time.
Unique video copies for TikTok, YouTube and InstagramYou set the setting ranges once. Then the Windows program creates copies in batches. Hundreds in one go.
Video uniquification for Windows – Video Unique BoosterYou add one video. The program creates hundreds of copies. Each has its own image, sound, metadata and duration.
What you need
A folder with source files and disk space. In the measurement below, the recommended recipe produced 0.44 of the source size: 484 megabytes against 1,102. But the total is misleading here: the heaviest file came out 1.14 times larger than its source. Estimate the disk space from the worst file and keep twice that amount free. With the short command from the section on broken output, the file of an 800×480 video grew 1.76 times in size. Your source files and your edit are different, so your growth may differ too.
Below are the three approaches, in order.
Approach 1: FFmpeg and a loop over the folder
This approach has the most manual settings, so the section is detailed.
There is one tool, and it is free: FFmpeg 12. The recipes below are written for Windows, for the PowerShell shell. What to do on macOS and Linux is covered at the end of the section.
FFmpeg has no installer, and the project’s website offers only the source code. For ready-made Windows builds, it links to two sites, one of them gyan.dev 19. Download the ffmpeg-release-essentials.zip archive there. Inside is a single folder with the version number in its name, for example ffmpeg-9.0.2-essentials_build, and in it a bin folder with the ffmpeg.exe program. Extract the archive to the C: drive and rename this folder to ffmpeg. The program will then be in C:\ffmpeg\bin. The path to this folder has to be added to the PATH variable, otherwise PowerShell will not find the program. One command does this:
[Environment]::SetEnvironmentVariable('Path', [Environment]::GetEnvironmentVariable('Path', 'User') + ';C:\ffmpeg\bin', 'User')
Close the PowerShell window and open a new one. To check, run ffmpeg -version: it prints the version number.
The commands are run from the folder with the videos. Go to it: cd D:\video, where D:\video is your folder.
The command processes one file. The shell loop feeds every file in the folder into it in turn. Here is the recommended recipe: it brings all videos to a vertical 1080×1920 frame with padding.
$video = '.mp4', '.mov', '.avi', '.mkv', '.3gp'
New-Item -ItemType Directory -Force out
Get-ChildItem -File | Where-Object { $video -contains $_.Extension } | ForEach-Object {
    ffmpeg -y -i $_.FullName -vf "scale=1080:1920:force_original_aspect_ratio=decrease,pad=1080:1920:(ow-iw)/2:(oh-ih)/2" -c:a copy "out\$($_.BaseName).mp4"
}
The first line lists the extensions the loop picks up. A *.mp4 mask will not do here. The same EVA-7K dataset has 140 untouched videos: 84 in .mp4, 52 in .mov and 4 in .3gp. A loop over *.mp4 would silently skip 56 of the 140. We tested both options on a mixed folder containing .mp4, .mov, .3gp, .avi and .mkv files. The mask picked up 2 files out of 6, the list picked up all 6. If your folder has other formats, add them to the list.
The recipe saves every result as .mp4. So two source files with the same name, a.mov and a.mp4, produce a single out\a.mp4: the second overwrites the first. Counting the files at the input and the output catches this loss; more on that below.
Audio removal and cropping go into the same command. Here are all three edits at once:
$video = '.mp4', '.mov', '.avi', '.mkv', '.3gp'
New-Item -ItemType Directory -Force out
Get-ChildItem -File | Where-Object { $video -contains $_.Extension } | ForEach-Object {
    ffmpeg -y -i $_.FullName -vf "crop=iw*0.9:ih*0.9,scale=1080:1920:force_original_aspect_ratio=decrease,pad=1080:1920:(ow-iw)/2:(oh-ih)/2" -an "out\$($_.BaseName).mp4"
}
The -an option removes the audio and takes the place of -c:a copy. The crop, crop=iw*0.9:ih*0.9, comes first in the -vf string, before scale. Here iw and ih are the width and height of the source frame. The command keeps the middle of the frame, 90% of each side, which means it cuts 5% off every edge. Fractions work for a folder with mixed resolutions; pixel values do not. We tested this command on the same mixed folder: all 6 files were processed, each 1080×1920 and without audio.
The -y option answers “yes” to the overwrite question in advance: without it, on the second run the program will ask, and processing will stop until you answer 4.
The New-Item line creates the output folder. Without it, FFmpeg will report an error on every video. The loop will not stop, though: PowerShell does not interrupt it when an external program fails.
The short version, scale=1080:1920, damages the frame in two ways. If the source has a pixel aspect ratio flag (SAR), the command flags the file so that the player turns it back into a horizontal video. If there is no flag, the command changes the picture itself. Both cases are covered in the section “Broken output that looks finished”. The same section shows one frame three ways: the source, what is in the file, and how it is displayed.
Here you control every setting, but you also have to watch every one yourself. As a commenter on Habr put it: “A whole sea of all kinds of encoding glitches came out” 5.
We took this approach too: before Video Unique Booster, we processed videos for our account networks with our own scripts. Building such scripts yourself is tedious, and that is one of the reasons we started building our own program. Our scripts silently skipped some of the files in a folder: those with a different extension or damaged ones. We only found out from the number of finished videos, and then the scripts had to be fixed.
Common mistakes:
- the loop goes over folders instead of files, and some source files are left unprocessed;
- the extensions are listed incorrectly, and some files silently drop out of processing;
- the overwrite question is left unanswered, and processing waits for an answer.
The first two mistakes pass without any messages: the loop finishes, but not all files have been processed.
The Russian-language search results we looked at more often offer .bat files for the old cmd command prompt than PowerShell scripts. We chose PowerShell. It comes with every copy of Windows 10 and 11, and the extension list and the checks are simpler to write in it.
If the videos are in subfolders, one line of the recipe changes, the third one: Get-ChildItem -File -Recurse | Where-Object { $video -contains $_.Extension -and $_.Directory.Name -ne 'out' } | ForEach-Object {. The -Recurse option goes into subfolders, and the condition on out keeps earlier results from being processed again. All results are saved to one out folder, so videos with the same name from different subfolders will overwrite each other. The file count will show this. We tested this line on a folder with two subfolders: all three videos were picked up, and the earlier result in out was not processed.
Make the same change, -Recurse plus the condition on out, in every block below that has Get-ChildItem -File: in the read-only pass, in the folder survey, in the verification and in the resume loop. Otherwise they will see only the top folder, and the count will not reveal overwritten files.
On macOS and Linux the FFmpeg command is the same; only the loop changes. Here it is for the bash shell:
shopt -s nullglob nocaseglob
mkdir -p out
for f in *.mp4 *.mov *.avi *.mkv *.3gp; do
    ffmpeg -y -i "$f" -vf "scale=1080:1920:force_original_aspect_ratio=decrease,pad=1080:1920:(ow-iw)/2:(oh-ih)/2" -c:a copy "out/${f%.*}.mp4"
done
The first line covers two cases. Without it, the loop passes the tool the literal name *.avi when the folder has no such files, and gets an error. And without it, the loop skips a file with an upper-case .MOV extension. On macOS the default shell is different, zsh, and it does not know the shopt line: type bash first. We tested this loop in bash 5.2 on Windows on the same mixed folder. It picked up all six files and a seventh, G.MOV. We did not run it on macOS or Linux themselves.
Conversion and compression with the same loop
To convert to another format and compress, only the middle of the command changes:
$video = '.mp4', '.mov', '.avi', '.mkv', '.3gp'
New-Item -ItemType Directory -Force out
Get-ChildItem -File | Where-Object { $video -contains $_.Extension } | ForEach-Object {
    ffmpeg -y -i $_.FullName -c:v libx264 -crf 23 -preset medium -c:a aac -b:a 128k "out\$($_.BaseName).mp4"
}
The -c:v libx264 option converts the video to the H.264 codec, and -c:a aac converts the audio to AAC. The compression strength is set by -crf: the higher the number, the smaller the file and the coarser the picture. The encoder uses 23 on its own if you do not set it. You can see this in the encoder settings line stored in the finished file: it says crf=23.0.
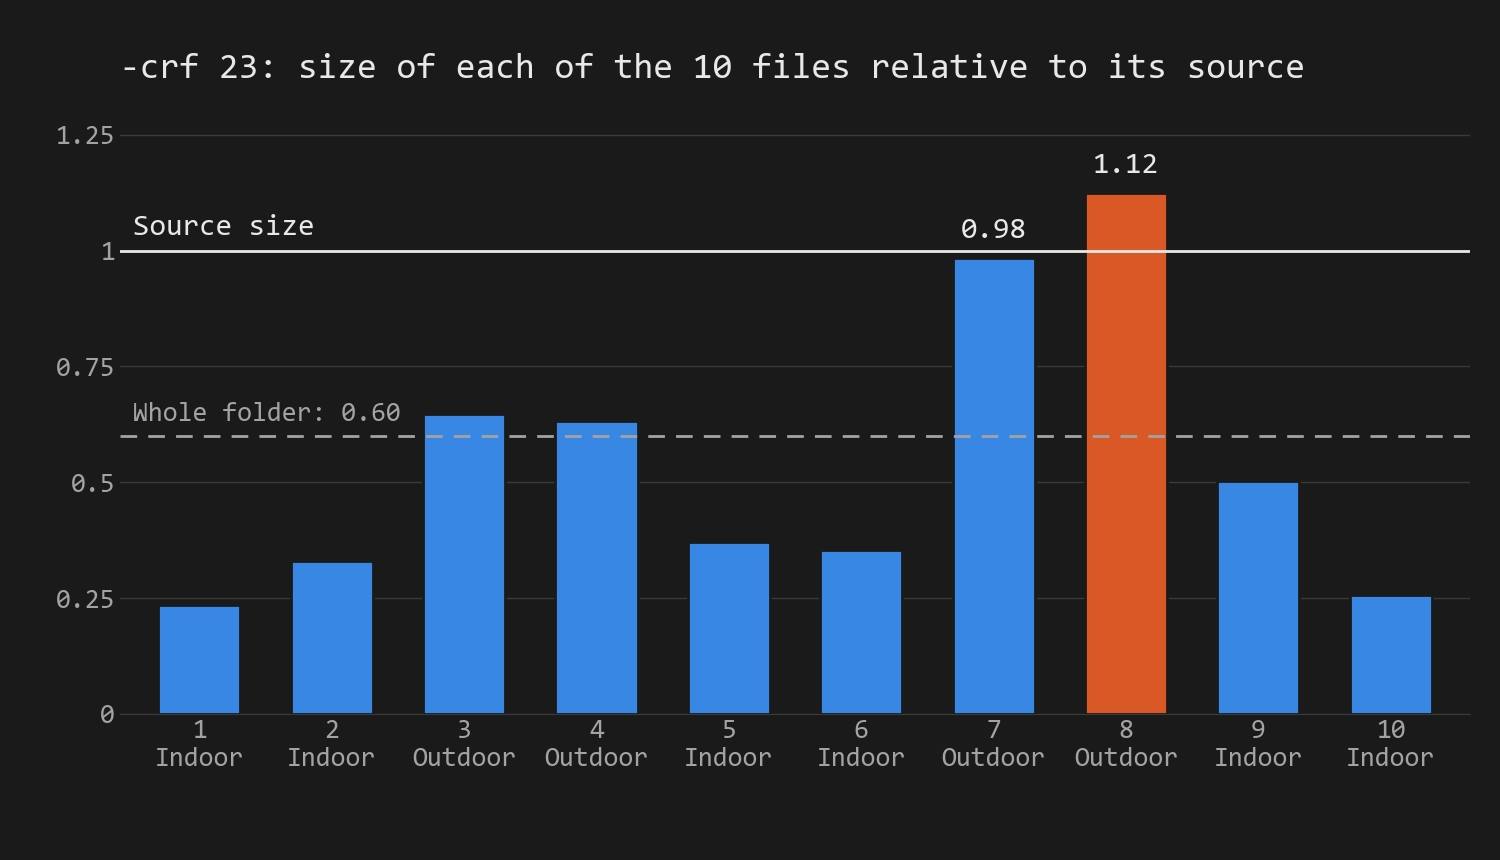
We tested this recipe on the same ten videos on September 26, 2026. With -crf 23, the 1.1-gigabyte folder shrank to 660 megabytes, 0.60 of the original. But not every file got smaller. One video barely compressed: 0.98 of its size. Another became larger than its source: 1.12. Both were shot outdoors. With -crf 28, the same folder shrank to 349 megabytes, 0.32 of the original. All ten files got smaller, and the worst result came from the video that had grown larger than its source at -crf 23: 0.64 of its size.
Conversion took as long as the recommended recipe when both ran within the same hour: one took 66 seconds per file, the other 68. That is longer than the 38 seconds in the main measurement: during that hour the computer was busy with other work.
Hence the rule: check the size of each file, not of the whole folder. The total does not show a video that got larger after compression. The verification from the section on broken output flags such files by itself.
An intro at the start of every video
Put the intro in an intro subfolder, name it intro.mp4, and run this from the folder with the videos:
$video = '.mp4', '.mov', '.avi', '.mkv', '.3gp'
$fit = 'scale=1080:1920:force_original_aspect_ratio=decrease,pad=1080:1920:(ow-iw)/2:(oh-ih)/2,setsar=1,fps=30'
$snd = 'aresample=48000,aformat=channel_layouts=stereo'
New-Item -ItemType Directory -Force out
Get-ChildItem -File | Where-Object { $video -contains $_.Extension } | ForEach-Object {
    ffmpeg -y -i intro\intro.mp4 -i $_.FullName -filter_complex "[0:v]$fit[v0];[0:a]$snd[a0];[1:v]$fit[v1];[1:a]$snd[a1];[v0][a0][v1][a1]concat=n=2:v=1:a=1[v][a]" -map "[v]" -map "[a]" "out\$($_.BaseName).mp4"
}
Only pieces with identical frame and audio parameters can be joined, and the intro and the videos usually differ. So the $fit line brings both pieces to a 1080×1920 frame with padding and to 30 frames per second. The $snd line brings the audio to 48 kHz stereo. The concat filter puts the intro before the video. The intro sits in a subfolder so that the loop does not take it for an ordinary video.
We tested the recipe on a mixed folder of six videos. The intro was three seconds long, horizontal 1920×1080, from a different phone and with 44.1 kHz mono audio. The videos themselves ran at 24 to 30 frames per second, with both mono and stereo audio. All six results came out three seconds longer than the source files: 8.03 seconds against the original 5.01-5.04. All of them have a 1080×1920 frame and stereo audio. Separately, we tested a video without an audio track: the recipe did not join it, and the output file cannot be read. The verification from the section on broken output will catch such a file. So add the intro before you remove the audio.
Keeping the first seconds, saving a frame from every video, and adding a watermark
The same loop makes these edits. Only the line with ffmpeg inside the curly braces changes:
- the first 15 seconds of every video:
ffmpeg -y -i $_.FullName -t 15 "out\$($_.BaseName).mp4"; - a frame at the 7th second as a
.jpg:ffmpeg -y -ss 7 -i $_.FullName -frames:v 1 "out\$($_.BaseName).jpg"; - a watermark in the lower right corner with a 20-pixel margin:
ffmpeg -y -i $_.FullName -i logo.png -filter_complex "overlay=W-w-20:H-h-20" -c:a copy "out\$($_.BaseName).mp4". Thelogo.pngimage sits in the same folder as the videos.
We tested all three lines on three full-length videos in .mp4, .mov and .3gp format and on one five-second video. The clip came out exactly 15 seconds long, and the five-second video stayed five seconds long. The watermark landed in the lower right corner. The frame at the 7th second of the five-second video was not produced at all, and the loop showed no error. Such a shortfall is visible only in the count. The verification below counts .mp4 files, so compare the number of frames with the number of videos yourself: (Get-ChildItem out -Filter *.jpg).Count.
The commands themselves, for a single file, are covered separately: making videos unique with FFmpeg (in Russian).
Approach 2: a program with a job queue
This approach gives you a familiar interface and familiar buttons. In Premiere Pro and VirtualDub you build the queue by hand; HandBrake adds a whole folder to it.
The task is always the same. “I need to remove the audio, crop the frame and slightly up the exposure to each one” is how a forum member with a folder of files from one camera described it 7.
The answer in the same thread is the standard one: work on one clip and copy its attributes to the rest 7. In DaVinci Resolve the same technique is called groups; a Russian-language video shows it on a shared color grade 9.
Bulk export is built into Premiere Pro: finished clips go to the Adobe Media Encoder queue. The steps recommended on the Adobe forum are 8:
- In the Project panel, create a folder (in Premiere it is called a bin).
- Drag all the clips into it.
- Select them all.
- In the export window, choose the “Source In/Out” range, that is, from the In point to the Out point of each clip.
- Click “Send to Media Encoder”. Each clip will come out as a separate file.
The audio is removed there too: when queuing the clips, uncheck the audio track 7. We did not test these steps ourselves, since we do not have Premiere Pro. Also keep in mind the difficulty from the thread about thirty clips 8: its author could not find a ready-made H.264 1080×1920 setting for a vertical sequence when exporting to MP4.
Add-ons such as Automation Blocks help repeat the same edits on a hundred videos in Premiere Pro 6.
A free program with a graphical interface is HandBrake. According to its documentation, the steps for a whole folder on Windows are 20:
- In the “Tools” menu, open “Preferences”. In the “Output Files” section, turn on “Automatically name output files” and set the output folder in the “Default Path” field. The “File Format” field must be set to “Title”: the documentation requires this separately.
- Click “Open Source” and choose the folder with the videos. HandBrake opens it as one source in which each video is a separate entry (a “Title”). It skips videos in nested folders.
- Choose a “Preset”.
- In the “Queue” menu, choose “All Selection to Queue”: all entries go into the queue.
- Click “Start Queue”.
The item names are from the Windows version. On a Mac the same item is called “Add Titles to Queue…” and is in the “File” menu; on Linux it is “Add Multiple” in the “Queue” menu.
We did not test these steps either. Check which of the three edits HandBrake can do on five of your own files.
Older tools have a queue too: a Russian-language video 11 shows VirtualDub, where jobs are added to a list and run in one go. Premiere Pro and VirtualDub share one drawback: the list is built by hand. The author of the question with thirty-odd clips does not want to set In and Out points thirty times in a row 8.
Approach 3: a program with bulk export
You set things up once. After that, the whole folder is processed in one run.
This is how Video Unique Booster, our program, works. It makes unique copies of every video. You set each setting as a range, and every copy gets its own random value from it. That is how brightness, rotation, edge cropping, audio volume and the other range settings work. The codec, the container, the audio sample rate and “File compression” are set once for the whole project. The codecs to choose from include H.264, H.265, AV1, VP9 and others; the containers are MP4, MOV, MKV, WebM and AVI.
The three edits from the start of the article (vertical with padding, audio removal and cropping) are handled by the first two approaches. The program works differently: a copy comes out the same size as the original, and “Crop edges” cuts a random number of pixels off each side and stretches the frame back.
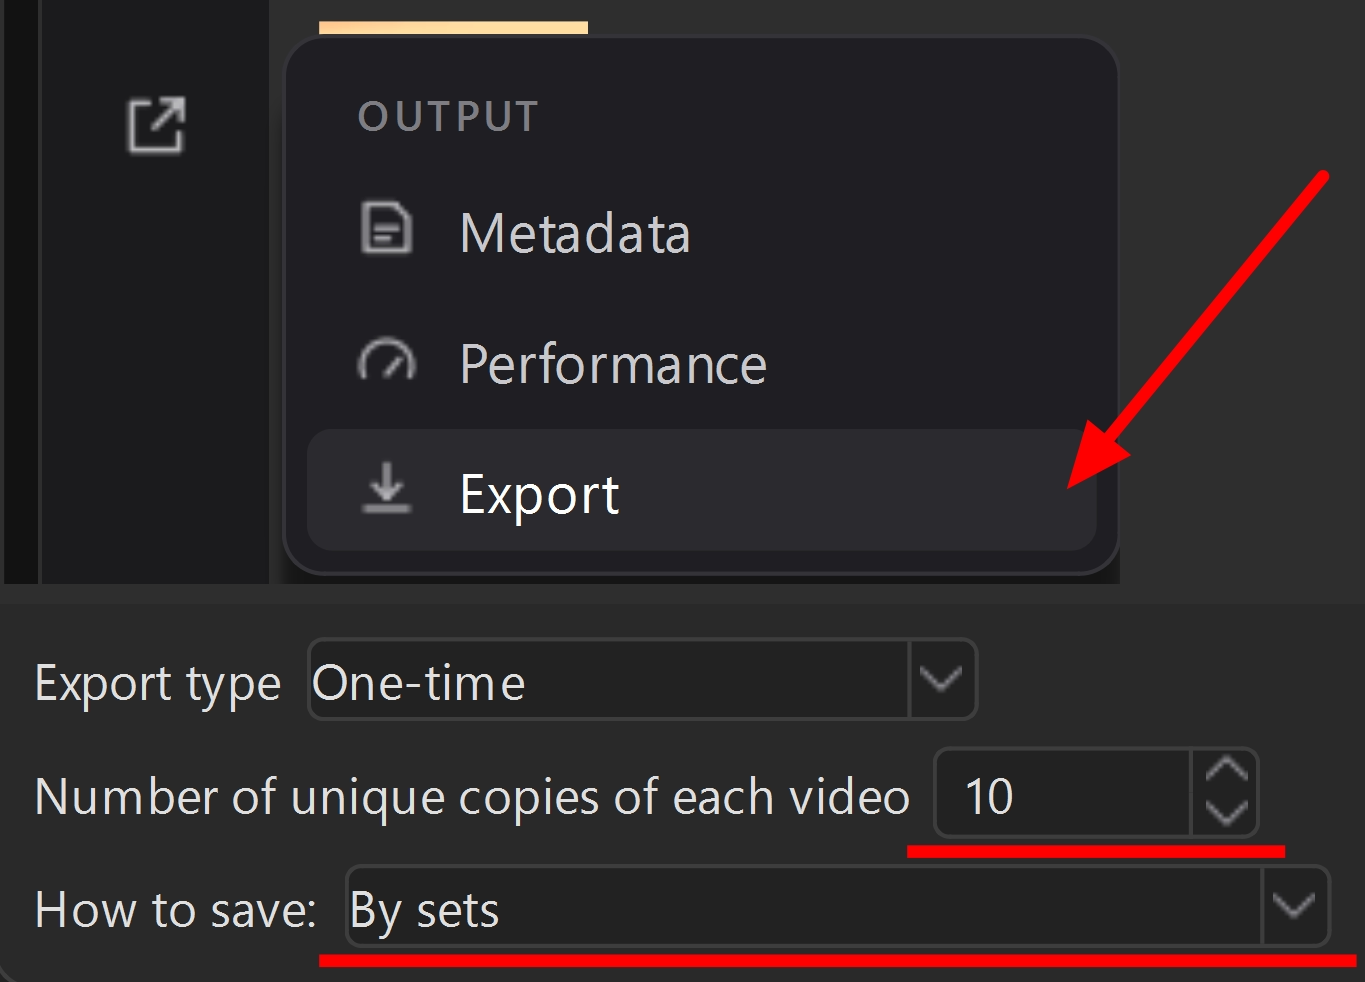
You need the program when you want different copies of every video in a folder. For example, for an account network where the same video is published on many accounts. The number of copies is set in the “Number of unique copies of each video” field: five videos at ten copies give fifty files. The “By sets” layout puts them into the pack0, pack1 and following folders, with one copy of each video in each folder. This makes the copies easy to distribute across accounts.
In the Instagram network we described above, there was no manual work at this stage. Video Unique Booster saved the finished videos to a folder. An autoposting program took them from there and published them on a schedule.
The program accepts 13 formats for import, including .mp4, .mov, .avi, .mkv and .3gp. It runs on 64-bit Windows 10 and 11. The settings are stored in the project, and the output is saved to a separate folder.
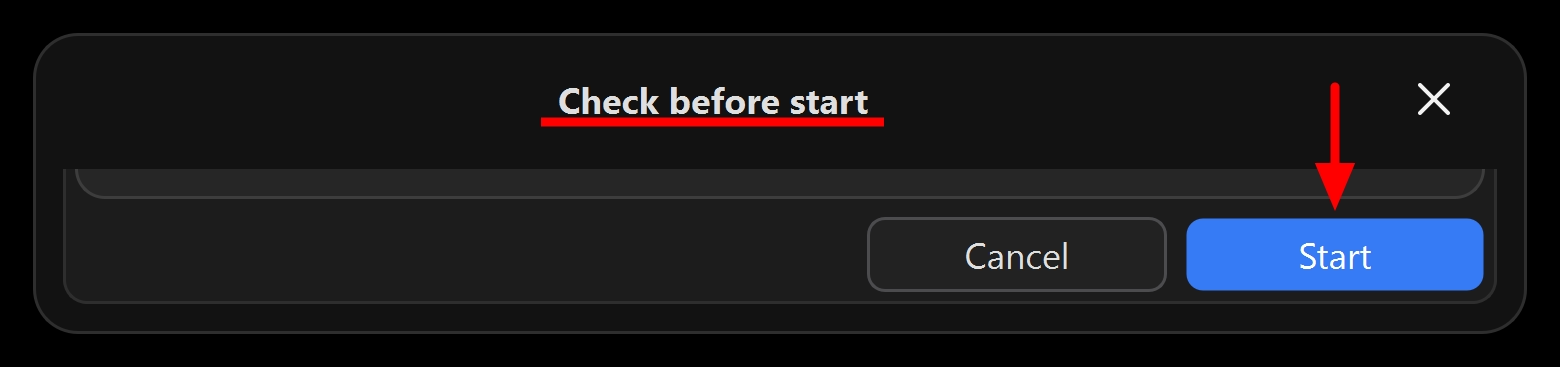
The workflow goes like this: you create a project, add the source files with the “Import video” button, set the settings and click “Start” in the launch bar. The “Check before start” sheet opens; in it, you click “Start” again.
After the first import, the button is called “Import more videos”, and a second way appears: you can drag a folder with the mouse straight into the list of imported videos. By default, finished files are saved not into the Save folder itself but into a dated subfolder inside it. There they are further split into sets: that is how the default saving mode works. The launch bar shows which file is being processed and how many there are in total.
Any such tool is checked the same quick way: process five files and count how many came out.
Bulk mode does not make things faster by itself. A client on a Russian-language freelance marketplace estimated adding an intro to 100 videos in VideoPad at about 30 hours 3, which is about 18 minutes per video. It cannot be compared with our 38 seconds: there the videos are 3-7 minutes long versus about 70 seconds for ours, and the intro goes into each video twice, at the start and at the end. Both examples lead to one conclusion: processing time is determined by the recording length and the complexity of the edit, not by bulk mode. Measure speed on your own edit and on five files, not one.
Four cases where processing goes wrong without warning
One unreadable file in the middle
File 47 of 300 is damaged. What happens?
There are three possibilities. Processing stops entirely. Or it silently skips the file. Or a broken output appears that looks finished. Which one happens depends on the processing method and on the kind of damage.
The loop from the first section will not stop: the shell does not check the exit code. In our measurement, FFmpeg could not open a truncated file at all. The command returned a nonzero code, and no output file appeared. That is the second possibility, and you learn about it at the end, from the file count.
A file with an intact header and damaged data inside the track gives the third possibility. The command returned code zero and wrote a full-size output, 18 megabytes in our case. The read errors went to the error stream: 10 lines. They are easy to miss in the loop’s overall output. The third possibility also comes up when processing is interrupted; there is a separate section on that below.
That is why you look for unreadable files before you start.
A separate first pass finds them, read-only:
$video = '.mp4', '.mov', '.avi', '.mkv', '.3gp'
Get-ChildItem -File | Where-Object { $video -contains $_.Extension } | ForEach-Object {
    ffmpeg -v error -xerror -i $_.FullName -f null -
    if ($LASTEXITCODE -ne 0) { "UNREADABLE: " + $_.Name }
}
The pass only decodes each file and writes nothing, so it takes less time than processing. We did not measure this separately. You get the list of bad files before the start.
We checked separately what exactly the -xerror option adds. We took one video, made three damaged copies of it and kept the intact one for comparison. A truncated file and the unfinished file of an interrupted processing run do not open at all. This video has its index (the moov atom) at the end of the file. Without the index the file cannot be read, and FFmpeg returns a nonzero code both with the option and without it.
But the index can also be at the start: that is how files are written for web playback, with the -movflags +faststart option. We took a video from the same dataset, re-saved it with the index at the start, and cut it in half too. Without -xerror, the check returned code zero; with it, a nonzero code.
Without the option, a file with an intact header and damaged data inside the track passes the check with code zero, even though 165 lines go to the error stream. With the option, the code is nonzero. These two cases are what the option is for.
Judge by the exit code, not by the messages. The intact file in the same measurement sent 29 lines to the error stream, and a rule like “messages mean the file is damaged” would reject a healthy video.
In Video Unique Booster the check comes earlier, at the moment files are added to the list: the program opens each file and does not accept the ones that fail to open. It lists the rejected files by name in the “Video import errors” window. The reason is shown next to the name if it is known. This window is shown below.
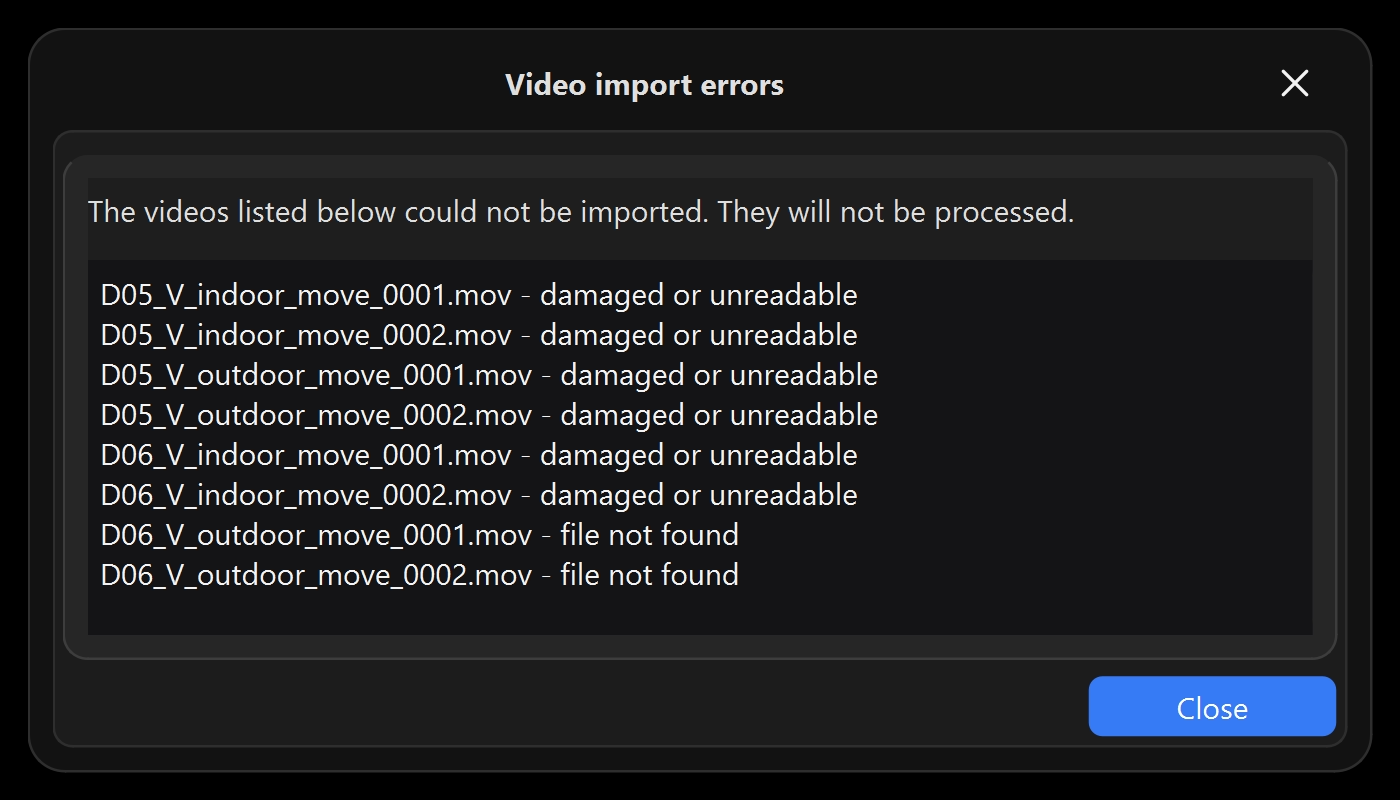
The program checks the container rather than reading the whole file. So it will accept a file with an intact header and damaged data inside the track. That is exactly the case the -xerror option is for. We called the function the program uses to check files on three copies damaged the same way. It rejected the truncated file and the unfinished one. It accepted the file with damage inside. So it does not replace the pass with -xerror.
Broken output that looks finished
The output is three hundred files. How do you make sure all three hundred are fine?
Here is what the measurement showed. We took ten untouched videos from the EVA-7K dataset, shot on three devices: four at 1280×720, four at 1920×1080 and two at 800×480. We processed them with the short command scale=1080:1920, without preserving the aspect ratio.
All ten ended up with a 1080×1920 resolution. But these files are displayed differently.
For eight files, the tool wrote a pixel aspect ratio flag that marks the pixels as non-square. Inside the file the frame really is squeezed horizontally, but the flag says to display it in its original proportions, and the player obeys: on screen you see the original horizontal video, not the vertical one that was the whole point. Programs that do not read the flag show the squeezed frame. The same file looks different in different programs, and none of them reports an error.
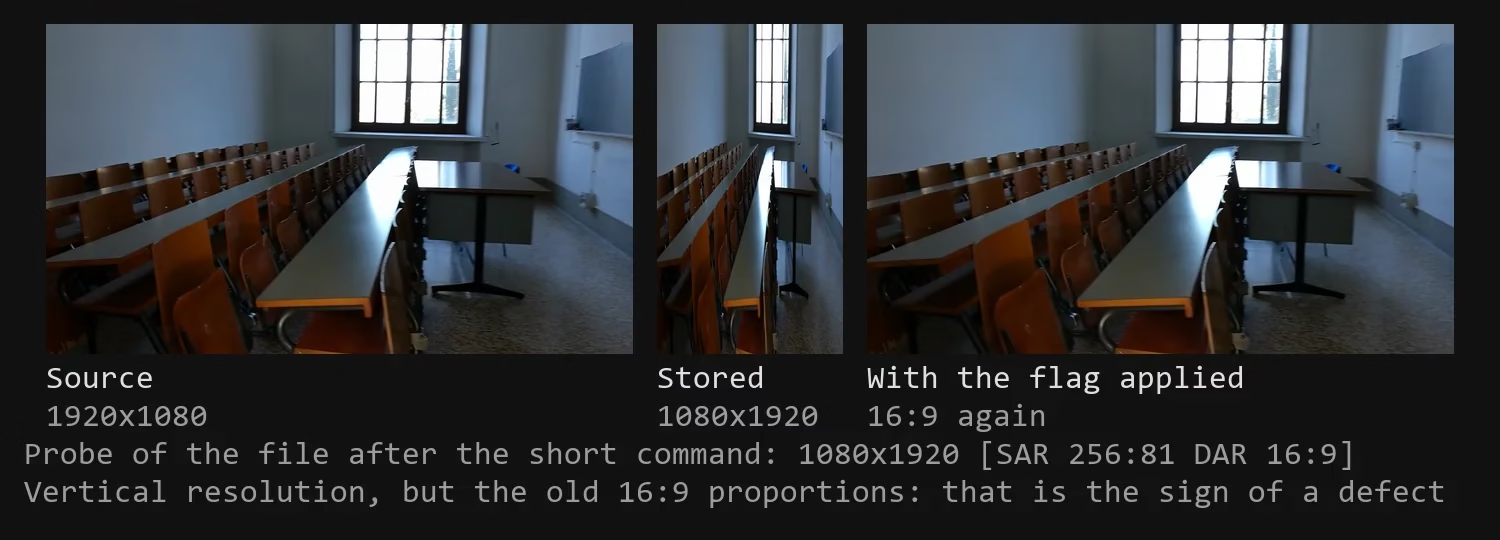
The other two videos came out vertical both in the file and on screen, but the command deserves no credit for it. Their files carry a 90-degree rotation flag: FFmpeg rotates such a frame before processing, so by the time it is scaled it is already vertical. For these two files, the result of the short command matched the result of the recommended recipe: the same size in bytes and the same flags.
File sizes diverged too: five files out of ten got larger than their sources. Here are four pairs from the measurement: 120.6 megabytes versus 105.7; 169.7 versus 152.3; 32.4 versus 18.4; 37.7 versus 29.0. The 800×480 video grew the most: it was upscaled to 1080×1920, and the file became almost twice as large.
There is a second kind of this defect. The source itself may have no pixel aspect ratio flag. One of the dataset’s .mov videos, for example, is recorded that way. On such a source, the short command flags nothing and changes the picture itself instead: a 16:9 frame is squeezed in width down to 9:16. In the probe line, such a file looks fine: 1080x1920 with no notes. It can be caught only by looking at the picture itself, and the verification below does exactly that.
Hence the main check: how the frame is displayed, not what resolution it has. A correct file and a broken one have the same resolution.
In total, the check looks at four numbers:
- resolution and aspect ratio. In the file’s probe line they sit side by side.
1080x1920 [SAR 1:1 DAR 9:16]means the frame is vertical both in the file and on screen.1080x1920 [SAR 256:81 DAR 16:9]is the very case where the flag turns the frame back into a horizontal one. There is also a third variant, produced by the recommended recipe itself:1080x1920 [SAR 1216:1215 DAR 76:135]. Six of our ten files came out like this, and it is a good frame. The pixel is practically square, and 76:135 differs from 9:16 by eight hundredths of a percent: that is rounding during scaling. So the rule is: if the resolution is vertical but the DAR says the frame is wider than it is tall, it is a defect. If the file has no DAR note, the frame aspect ratio matches the resolution. - duration. If the edit does not change the length of the video, the duration of the output should match the original. A mismatch is a reason to open the file, but not yet a defect: one of our ten videos has 70.7 seconds in its header, but reading it gives 44.3, and after processing the file has the same 44.3. Nothing is lost: it was the duration in the source’s header that was wrong.
- number of output files. There should be exactly as many as there were at the input, or, if the setting makes several copies per file, that many times more.
File size is not a sign of a defect. The short version ruined eight files, but only five came out larger than their sources. With the recommended recipe, two files out of ten came out larger than their sources, and both are fine.
One command checks these numbers and the picture itself. It prints the file count and, below it, only the files where something is wrong. Two lines at its start are adjusted to your edit:
$video = '.mp4', '.mov', '.avi', '.mkv', '.3gp'
$tall = $true   # $true: output is vertical; $false: horizontal; $null: frame size unchanged
$plus = 0       # how many seconds the edit adds to the video, e.g. 3 for a 3-second intro
function Probe($file) {
    $text = (& ffmpeg -hide_banner -i $file 2>&1) -join ' '
    $info = @{ time = -1; shape = 0 }
    if ($text -match 'Duration: (\d+):(\d+):([\d.]+)') { $info.time = [int]$matches[1] * 3600 + [int]$matches[2] * 60 + [double]$matches[3] }
    if ($text -match ', (\d{2,5})x(\d{2,5})') { $info.shape = [int]$matches[1] / [int]$matches[2] }
    if ($text -match 'DAR (\d+):(\d+)') { $info.shape = [int]$matches[1] / [int]$matches[2] }
    if ($text -match 'rotation of -?90') { $info.shape = 1 / $info.shape }
    $info
}
function Picture($file) {
    $text = (& ffmpeg -hide_banner -sseof -3 -i $file -t 2 -vf cropdetect -f null - 2>&1) -join ' '
    $all = [regex]::Matches($text, 'crop=(\d+):(\d+)')
    if ($all.Count -eq 0) { return 0 }
    $last = $all[$all.Count - 1]
    [int]$last.Groups[1].Value / [int]$last.Groups[2].Value
}
$src = Get-ChildItem -File | Where-Object { $video -contains $_.Extension }
"input $($src.Count), output $((Get-ChildItem out -Filter *.mp4).Count)"
foreach ($file in $src) {
    $out = "out\$($file.BaseName).mp4"
    if (-not (Test-Path $out)) { "NO OUTPUT: $($file.Name)"; continue }
    $a = Probe $file.FullName
    $b = Probe $out
    if ($b.time -lt 0) { "UNREADABLE: $out"; continue }
    if ([math]::Abs($a.time + $plus - $b.time) -gt 0.5) { "DURATION: $($file.Name), was $($a.time) s, now $($b.time) s" }
    if ($tall -eq $true -and $b.shape -gt 1) { "ASPECT: $($file.Name), frame displays as horizontal" }
    if ($tall -eq $false -and $b.shape -lt 1) { "ASPECT: $($file.Name), frame displays as vertical" }
    $pic = Picture $out
    if ($pic -gt 0 -and $a.shape -gt 0 -and [math]::Abs($pic / $a.shape - 1) -gt 0.05) { "DISTORTION: $($file.Name), picture is squeezed or stretched" }
    if ((Get-Item $out).Length -gt $file.Length) { "LARGER THAN SOURCE: $($file.Name)" }
}
The $tall line sets how the frame should come out: vertical is $true, horizontal is $false. If the edit does not change the frame size, as with conversion, set it to $null, and the aspect check is turned off. The $plus line sets how many seconds the edit adds to the video. For a 3-second intro, set it to 3.
There are six kinds of findings. “NO OUTPUT”: there is no finished file. “UNREADABLE”: the file exists, but FFmpeg could not open it. “DURATION”: the length differs by more than half a second. “ASPECT”: the frame displays as horizontal instead of vertical, or the other way around. “DISTORTION”: the picture without the black bars is stretched differently from the source. The bars are found by the cropdetect filter, from the dark edges of the frame in the last seconds of the video, so an intro does not interfere with this check. If a video ends on a dark scene, “DISTORTION” may be a false alarm: just open that file. “LARGER THAN SOURCE” is not a defect, but when compressing it is a reason to raise -crf.
We tested the command on five-second clips cut from the six videos of the mixed folder and on a seventh clip, from a video with a rotation flag. On the output of the recommended recipe, the conversion and the intro, it named no files. On the output of the short command, it named all six broken ones: five with “ASPECT” and “DISTORTION”, and the video without a pixel aspect ratio flag with “DISTORTION”. It did not name the rotated video, which came out correct. It reported a deleted output as “NO OUTPUT” and one cut in half as “UNREADABLE”.
This command does not work for copies from Video Unique Booster: the program has its own folders and names. For its copies, a count is enough: there should be as many files as you get by multiplying the number of videos by the number of copies.
Never skip the file count: in the discussion on the Russian-language Linux forum mentioned above, a person ran processing on 1,023 files and got 900 4. The shortfall there was put down to one cause, incorrect substitution of the file name. The same thread advises checking two more things: output names that coincide, and a missing -y option, which makes processing stop at the overwrite question.
The quality loss from re-encoding was measured in a separate study. For the HEVC standard, re-encoding lowered PSNR by 0.35 dB at the best point and by 0.63 dB when the stream was compressed by about a quarter. The average maximum loss over the whole tested range was 1.4 dB. In the modes the authors call practically useful, the loss stays below 0.7 dB 1. You cannot read this as “the file got 0.35 dB worse”: the study compared re-encoded video with video compressed directly to the same bitrate, that is, it measured the loss from the repeated compression specifically.
What this difference means to the eye, the study does not say. PSNR measures the discrepancy between pixel values, not how visible the distortions are. Another study compared quality metrics with human ratings. At high bitrates, the correlation with human ratings came out at 0.25-0.45 for PSNR and most other metrics, and at 0.7 for the best of the newer ones. On H.264 streams, the correlation was above 0.94 for all metrics 17.
The HEVC study 1 did not measure a chain of several re-encodings: the authors refer to their earlier work, where the accumulation of losses was measured. We have no measurement of our own either. The practical conclusion is simple: every extra re-encoding is one more loss. So make all your edits with one command, as in the three-edit recipe, rather than in three runs one after another.
Mixed source files
The folder holds files with different resolutions, frame rates and codecs.
One command gives them different results, which is exactly what the measurement above showed. None of the eight pages we read mentions this; their list is at the end of the section.
A quick survey of the folder helps sort the source files. The same FFmpeg is enough for it:
$video = '.mp4', '.mov', '.avi', '.mkv', '.3gp'
Get-ChildItem -File | Where-Object { $video -contains $_.Extension } | ForEach-Object {
    $info = & ffmpeg -hide_banner -i $_.FullName 2>&1 | Select-String "Stream #.*Video"
    "$($_.Name): $info"
}
For each file, it prints the resolution, frame rate and codec. Groups of files with the same parameters are visible right away.
From here there are two options. The first is to sort the files into groups and give each group its own target resolution. The second is to add aspect ratio preservation to a single command, as in the recommended recipe: force_original_aspect_ratio=decrease fits the whole frame in, and pad adds padding around it. We tested the second option on 1280×720, 1920×1080 and 800×480 videos: the output is 1080×1920 with no distorted proportions.
A special case is vertical video with a rotation flag. When you watch it, the video is vertical, but in the file the frame is stored horizontally and flagged with a 90-degree rotation. In the probe, such a file shows a horizontal resolution, for example 1280×720, and a rotation line.
We tested one way of processing it: when re-encoding, FFmpeg rotates the frame itself and removes the flag, and the result is correct, 1080×1920. We did not measure stream copying (-c copy).
Watch the rotation angle in the flag too. In our measurement, four files out of ten had the flag, but only two of them changed orientation: the ones rotated by 90 degrees. The other two have a 180-degree flag: the frame is flipped, but the proportions stay the same. For files rotated by 90 degrees, the folder survey above prints a horizontal resolution even though the video is vertical. The verification from the section on broken output takes this into account.
Interrupted processing
You closed the laptop lid. The disk ran out of space. The program stopped responding.
Processing of 300 files broke off at file 150. What now?
None of the pages with ready-made code that we read offers a way to resume from where it stopped: either everything is processed again, or behavior after an interruption is not mentioned at all.
On a single computer, selecting files before the run solves the problem. Put the output in a separate folder, and before a new run select the source files whose finished file is missing or unreadable:
$video = '.mp4', '.mov', '.avi', '.mkv', '.3gp'
New-Item -ItemType Directory -Force out
Get-ChildItem -File | Where-Object { $video -contains $_.Extension } | Where-Object {
    if (-not (Test-Path "out\$($_.BaseName).mp4")) { return $true }
    ffmpeg -v error -xerror -i "out\$($_.BaseName).mp4" -f null - 2>$null
    $LASTEXITCODE -ne 0
} | ForEach-Object {
    ffmpeg -y -i $_.FullName -vf "scale=1080:1920:force_original_aspect_ratio=decrease,pad=1080:1920:(ow-iw)/2:(oh-ih)/2" -c:a copy "out\$($_.BaseName).mp4"
}
The technique is not ours: large data processing pipelines also split work into parts and, after a failure, recompute only the lost parts rather than everything 2. An important caveat: that study is about machine learning pipelines, not re-encoding. There the video is broken into frames and run through recognition, and there is no output file at all. We did not find any studies specifically on the robustness of batch video processing.
Checking the name alone is not enough. The file on which processing broke off is already in the output folder, unfinished, and by its name it cannot be told apart from a finished one. We interrupted processing four seconds after it started.
The first idea that comes to mind is filtering by size: treating a file that is too small as broken. That does not work: the unfinished file was 3.4 megabytes versus 17.5 for the finished one, and a 100-kilobyte threshold does not filter it out. A threshold relative to the source size is unreliable too. In our case the unfinished file was 0.03 of its source, while four finished files out of ten were 0.12 to 0.23. But the size of an unfinished file depends on when processing broke off. A threshold that catches a file interrupted closer to the end will also catch finished files, and they will be redone on every run.
So whether a file is usable is checked by reading it, as in the first pass: an unfinished file does not open at all. FFmpeg writes the index at the end of the file, and the writing stopped before that. The loop above tries to open each finished file and processes the sources whose files did not open. This is slower than comparing names: there only names are compared, here every file is read. We did not measure how long this check takes. We did test the loop: in a folder of three videos, where one output was finished, the second was left unfinished and the third did not exist at all, the loop processed only the second and the third.
Where did these four cases come from? We collected eight pages on September 22, 2026, with five Russian-language search queries, and read them in full; five of them are listed in the sources: 4, 13, 14, 15, 16. The other three are a sales page for VidBatch, a help page on the VideoPad menu, and an overview on napli.ru, a Russian-language site, with one ready-made script for converting webm to mp3. They do contain individual tips, such as the -y option and the file count in 4. But none of the four cases is covered in full on any of the eight. These are not the top ten search results, but the eight pages that we found and that opened.
Where this does not work
Batch processing does not replace editing: it repeats one action and makes no decisions about the frame.
Whether identical processing makes videos different in the eyes of a platform is unknown: opinions on Russian-language affiliate marketing forums differ. “I tried batch video processing programs, and with them I got no views,” a member wrote in 2020 10. In 2025, someone in the same thread wrote the opposite: “ffmpeg has the richest toolkit for making videos unique, everything gets through” 10. Neither side has a measurement behind its opinion. We covered what TikTok’s rules say about repeated videos in the feed in the article on the TikTok algorithm (in Russian).
Identical editing of a whole folder makes the copies of a video identical to each other. A program with ranges works differently: each copy gets its own setting values. We did not publish videos without uniquification in our Instagram network. Before the network, on one account of our own, other people’s videos from other social networks, unedited, soon started getting zero views. That is our observation, not a measurement.
Our example from X does not settle this dispute either. In our X network in January 2024, we replaced the media files in posts with unique copies, and traffic grew fourteenfold. But in the same step we also changed how the accounts were linked to one another. Both changes were made at the same time, and these data cannot tell which of them caused the growth.
Further reading: making videos unique for TikTok (in Russian), how to make videos unique for Instagram (in Russian), how to make videos unique for YouTube (in Russian).
Frequently asked questions
Where to start
Take five files from your folder. Process them with the method you chose. Look at the result and check four numbers: resolution, aspect ratio (DAR), duration and the number of output files.
If the result is good, run processing on the whole folder. If not, change the settings and test them on the same five files.
Sources
- Grajek T., Stankowski J., Karwowski D., Klimaszewski K., Stankiewicz O., Wegner K. Analysis of video quality losses in the homogenous HEVC video transcoding. Poznań University of Technology, 2017. ↩︎
- Luan F. S. et al. The Streaming Batch Model for Efficient and Fault-Tolerant Heterogeneous Execution. 2025. ↩︎
- A job posting for adding an intro to 500 videos, with an estimate of about 30 hours per 100 videos in VideoPad (in Russian). Freelancehunt, a freelance marketplace; the page does not show the year of publication. ↩︎
- A discussion of processing a collection of 1,023 files (in Russian). Linux.org.ru, 2023. ↩︎
- Comments on an article about batch video processing (in Russian). Habr, 2023. ↩︎
- Discussion "How to automate repetitive product video edits". Adobe Community, 2025. ↩︎
- Discussion "Batch process video files". Adobe Community, 2020. ↩︎
- Discussion "30 separate edited clips on one timeline that i want to batch export". Adobe Community, 2025. ↩︎
- DWUL. Processing a series of clips in DaVinci Resolve with groups (in Russian). YouTube. ↩︎
- Discussion "How to make videos unique for TikTok" (in Russian). Zismo.biz, an affiliate marketing forum, 2020-2025. ↩︎
- KrezWorld. Processing a series of video files in VirtualDub with a job queue (in Russian). YouTube. ↩︎
- FFmpeg: download page. The project's official website. ↩︎
- Batch file processing with CMD and Bash loops (in Russian). Annimon, 2021. ↩︎
- Batch re-encoding of hundreds of files with a script (in Russian). Habr, 2012. ↩︎
- Useful FFmpeg commands (in Russian). Losst, 2016, updated in 2020. ↩︎
- A question about cutting all videos in a folder at once (in Russian). Habr Q&A. ↩︎
- Antsiferova A., Yakovenko A., Safonov N., Kulikov D., Gushin A., Vatolin D. Objective video quality metrics application to video codecs comparisons: choosing the best for subjective quality estimation. Moscow State University, 2021. ↩︎
- Yang P., Baracchi D., Iuliani M., Shullani D., Ni R., Zhao Y., Piva A. Efficient Video Integrity Analysis Through Container Characterization. IEEE Journal of Selected Topics in Signal Processing, 2020: description of the EVA-7K dataset. ↩︎
- FFmpeg: builds for Windows. gyan.dev, linked from the FFmpeg download page. ↩︎
- HandBrake Documentation: Using the queue. HandBrake Team. ↩︎
